
Johnny Boy on Yankee Hat South | photo Shell D
Saturday 28 September: Yankee Hat South and Rock Art – M/R,ptX. Explore Yankee Hat South (1558m), the seldom climbed bigger of the two Yankee Hats. Walk the to the rock art on footpad, then off track following the drainage line across the lower rise of Yankee Hat North to meet the arm of Bogong Creek heading to the saddle between the Hats. From here follow the creek arm to the saddle, and summit Yankee Hat South. For those with a love of scrub, rock scrambling, and adventure. Leader: Shell D.
Further Information
Previous visits on 22 Jun 10, 29 Aug 06, 5 Feb 05.
Summary
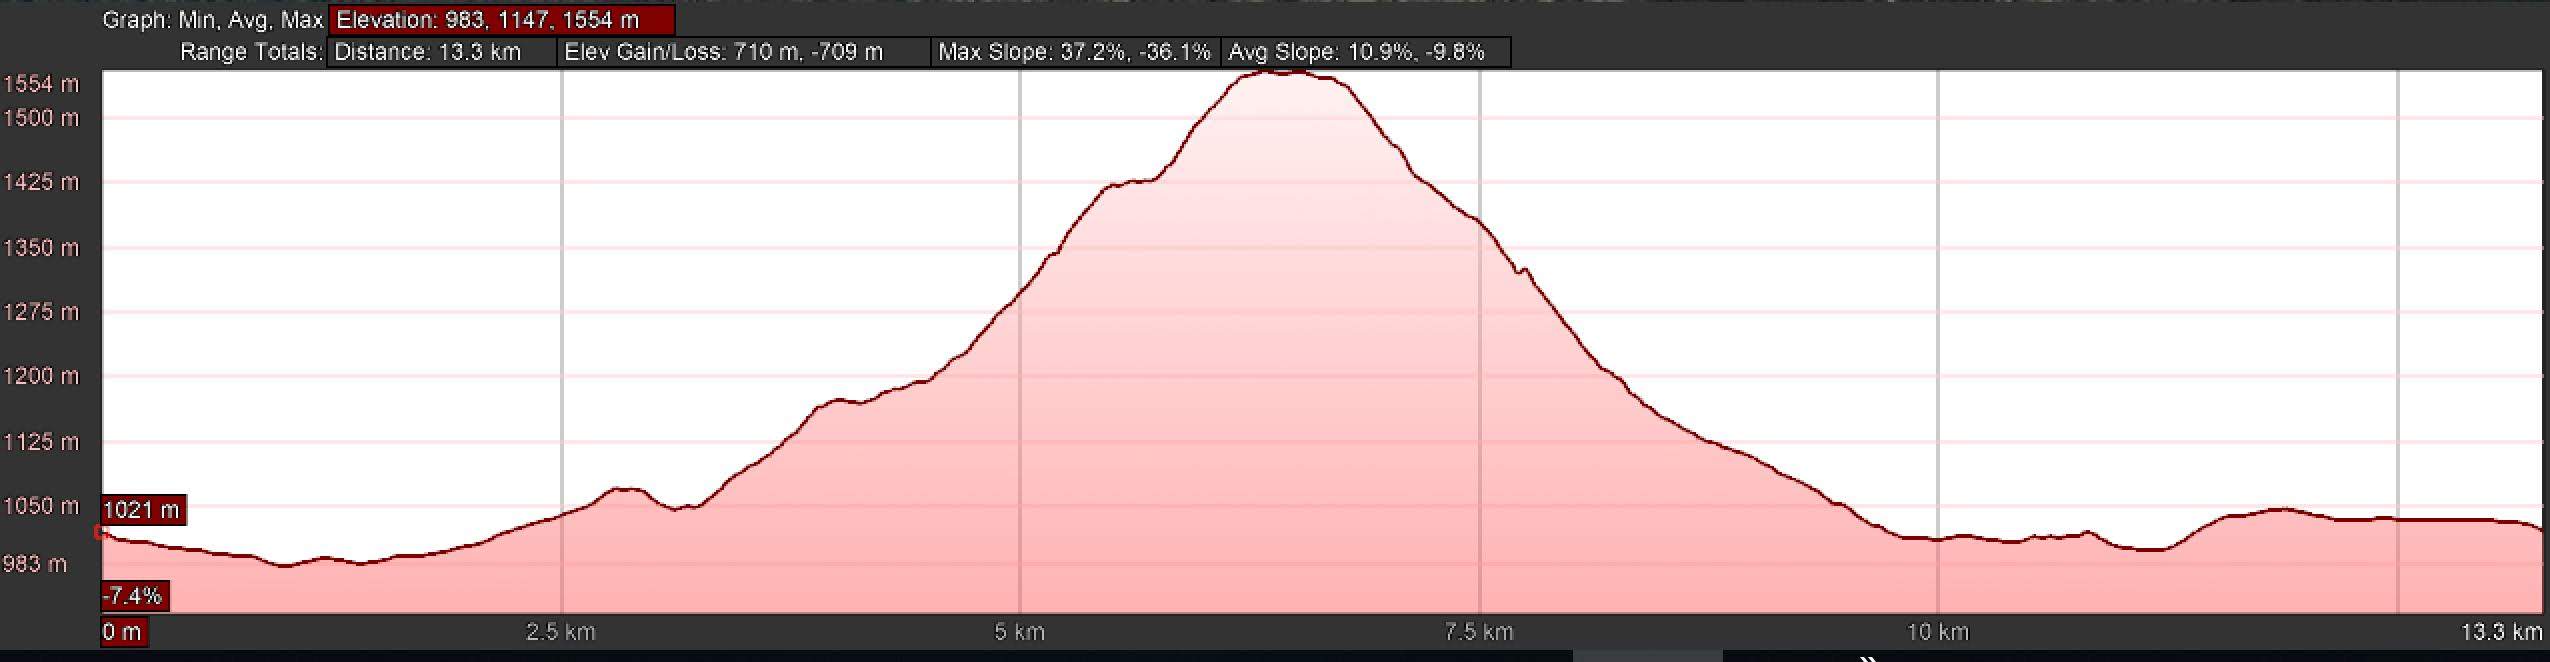
Distance: 13.8km | Climb: 700m | Time: 8.00am – 4.15pm (8hrs 15mins), including 65 mins of breaks | Grading: M/M-R; H(12)
Photographs
Photographs are available, where you can start a large sized slideshow.
Waypoint and Track Files
Download the gpx file for this trip (if your browser does not automatically download the file, it will open the gpx file in a new window and you can then save it). To use in Google Earth, do File, Open… and select Gps or All files as the File Type.
Track Notes
Great view to our destination from near the car park.

Yankee Hat South, Yankee Hat North from the car park
A few hundred meters on, excellent view to the hills at the heart of the Park.

Mt Burbidge, Mt Namadgi, bottom of the Mavis Ridge
Then down to cross the bridge over Bogong Creek and the boardwalk.

The boardwalk across Bogong Swamp
We called in at the Yankee Hat rock art.

Detail of some of the Yankee Hat rock art
From here, Shell had chosen a rather excellent route. We handrailed a gully heading up to the WSW, cutting across the bottom of a spur up to Yankee Hat North. Coming round onto the SW flank of the spur towards the (dry) creek line between the two Yankee Harts, the vegetation was a little moister.
On the flanks of Yankee Hat South | photo Shell D
We only followed the main creek line for a couple of hundred meters, then turned more to the west following
With our objective only around 400m away and drifting more than 90deg to our left, I had the temerity to ask our leader when we were going to turn directly towards it. I was told not to worry, that a more gentle ascent from the north had been planned. Indeed, that it was – and the best approach to the top I’ve ever experienced. The going was relatively easy.

The going at 1410m
We passed a giant tor or two.

Passing a tor at 1430m
Then, to draw our attention to smaller things, a bird’s nest in a tree stump.

Small and delicate birds nest
The bush cleared for a while and a series of granite slabs made for quick walking.

On the waypointed slab at 1490m
A pause to check direction.

A pause at 1500m
We sidled past a more severe slab which may have presented more of a challenge if a direct ascent had been made.

More slabs with Yankee Hat North behind the tree
Great views to nearby hills opened up.

Mt Mavis and Mt Herlt from 1510m
Another granite slab rose gently to what we thought could be the top, but the GPSr showed another 175m to go. We pushed through to this point, another open granite slab with wonderful views to the SW.

View SW from lunch to Sentry Box Mtn, Mt Gudgenby, Mt Mouat on the SE Scabby Range
Lunch was called and the opportunity taken for a call home and a Facebook post. Celebrations all round.

Leader Shell on Yankee Hat South with Mt Gudgenby at back
Thinking it was all downhill from here, an impromptu call was made to examine a higher set of boulders nearby. Great find of a cairn, surely the highest point! Some secret business was done – to be revealed later.

contesta up to secret business
We left at 1pm, and after a short period of descent, passed through a lovely stand of golden wattle.

Golden wattle on Yankee Hat South
We again cut the corner of the saddle between Yankee Hats South and North and followed the feeder gully to the main creek line. We now continued handrailing this to the bottom, a long leg deserving a little break.

A break coming down at 1300m
At last we hit a fire trail near Bogong Creek, which took us SW to cross the causeway then NE to join the Old Boboyan Rd and so back to the cars.
A great trip, excellently planned and led. Thanks Shell and all!
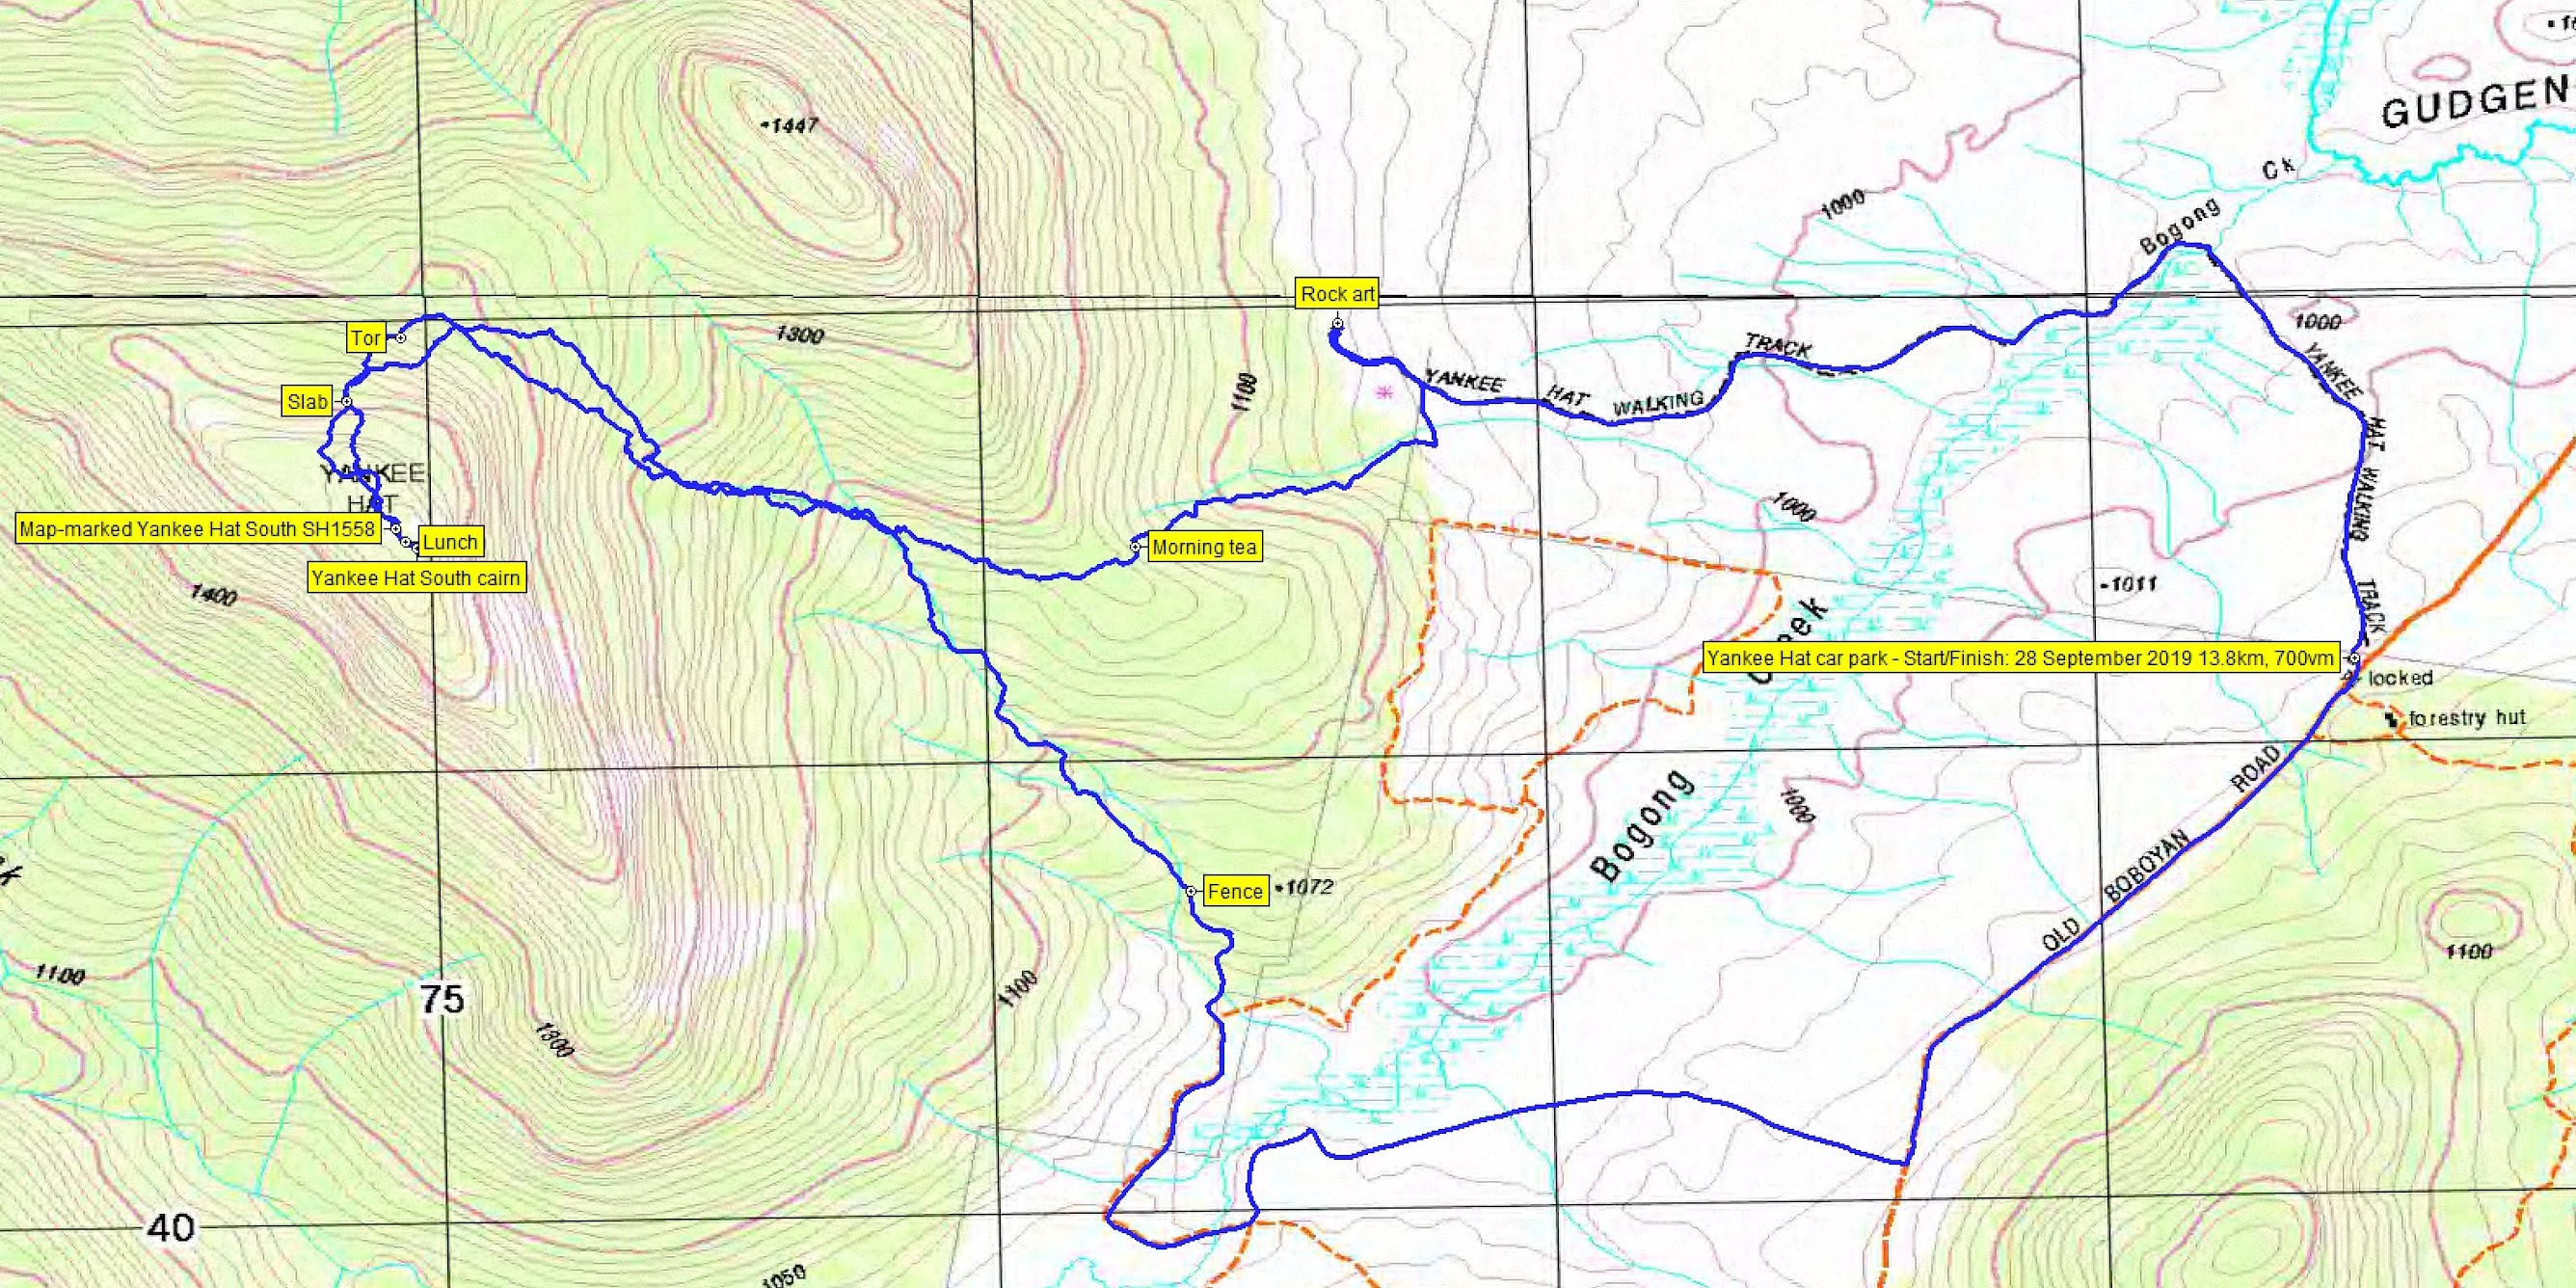
Track Maps
Track
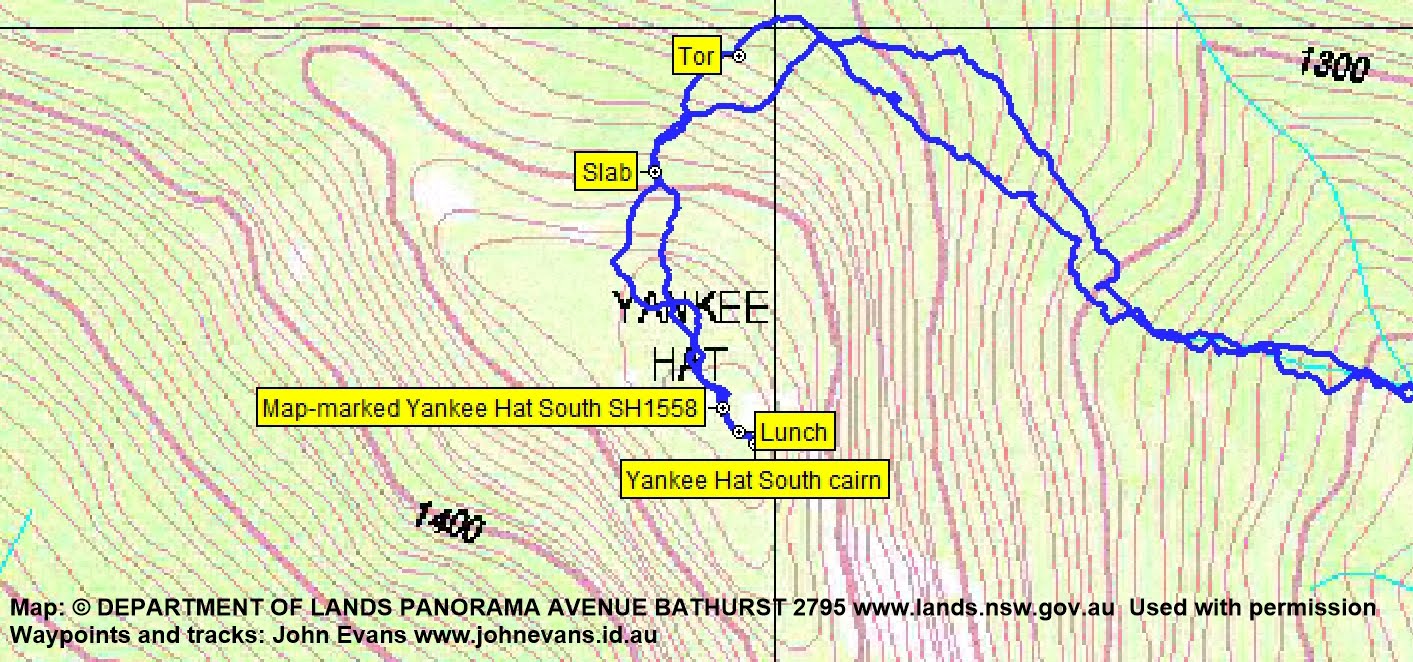
Track detail
Profile
Party
7 walkers – Shell D (leader), Thushara De Z, Stephen M, Beat O, Justin S, Diana T, me.
LIKE WHAT YOU SEE? WHY NOT SUBSCRIBE TO GET AN EMAIL NOTIFICATION WHENEVER A NEW TRIP REPORT IS POSTED.