Last updated 16Sep16
Armchair Bushwalking
Some useful preparation and post-walk joy and pain recollection can be achieved using a combination of hardware, software, and digitised map data.
The hardware I use is:
• a Garmin Oregon 650 GPSr (keep the firmware up to date with Garmin’s WebUpdater or when connected to BaseCamp)
• a (Windows 10) laptop.
The software I use is:
• OziExplorer 3.95.6 GPS Mapping Software with the 3D option (ie. OziExplorer3D is installed).
The digital data I use is:
• NSW Department of Lands TopoView Raster 2006 digital map images. (These replaced the earlier NSW TopoView CD #5.)
• GPSOZ supplied .map files to allow OziExplorer to access the digital maps
• OZraster digital maps supplied by GPSOZ
• Geoscience Australia 9 Second DEM (height data)
• other digital maps, such as: (1) ACT 1:250000 Special; (2) In August 2005, GPSOZ advertised a DVD of all NSW 1:25000 and 1:100000 maps (now available free from maps.nsw.gov.au ), calibrated ready for use by OziExplorer, for $30 for their trouble. These are more primitive maps (eg. no grid lines).
The primary supplier I use is GPSOZ , a company in Sydney who do excellent mail order and who are very helpful. I purchased OziExplorer, TopoView, DEM data, and OZTopo V4, from them. I purchased the GPSr from Johnny Appleseed
I also have an old Garmin etrex H GPSr and data cable talking to a PC running Garmin’s BaseCamp Version 4.3.2 which uses OZtopo V4 maps. The Oregon can talk to BaseCamp and see the OZtopo maps, but I prefer the TopoView Raster 2006 digital maps, as they are the same as the paper topographic maps.
As an example let’s take the walk of 27 Oct 07:
Start the OziExplorer software on the laptop and load the current Tidbinbilla map from the TopoView Raster 2006 map collection (or, better still, load the NSW mosaic which allows panning across map sheet areas). This is a second edition, 1:25000 map, an image of the current paper map.
First, draw a proposed track. Then position some Waypoints, typically bounds for navigation at significant points.
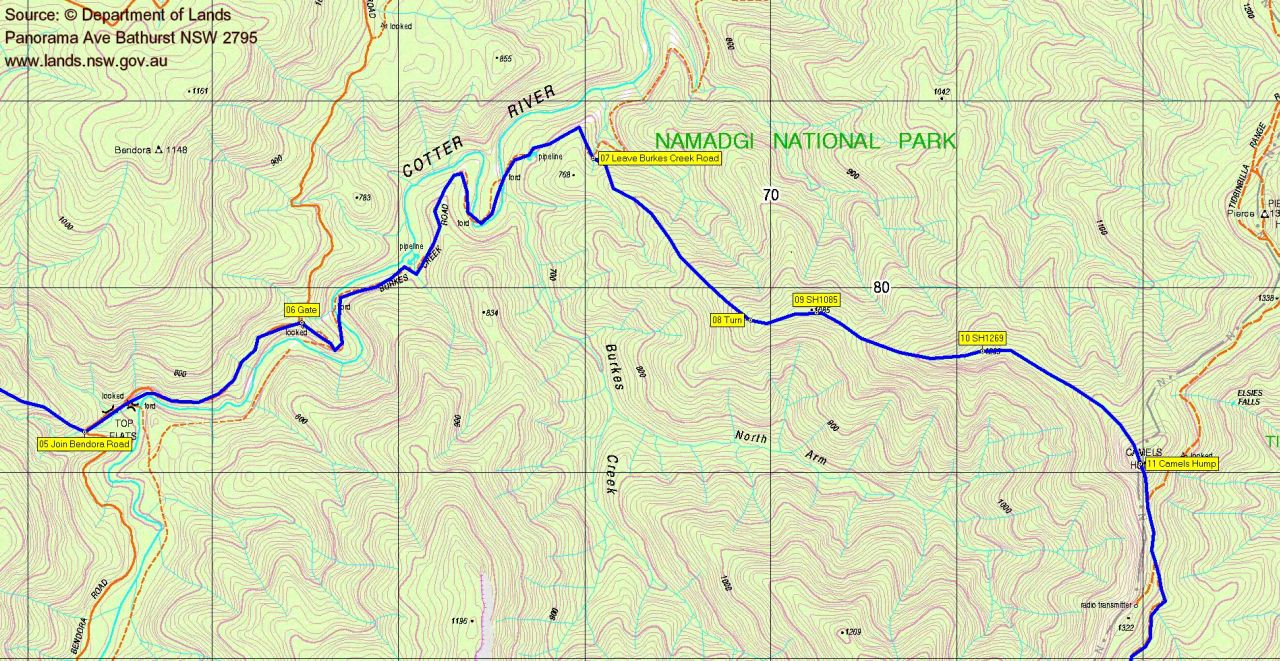
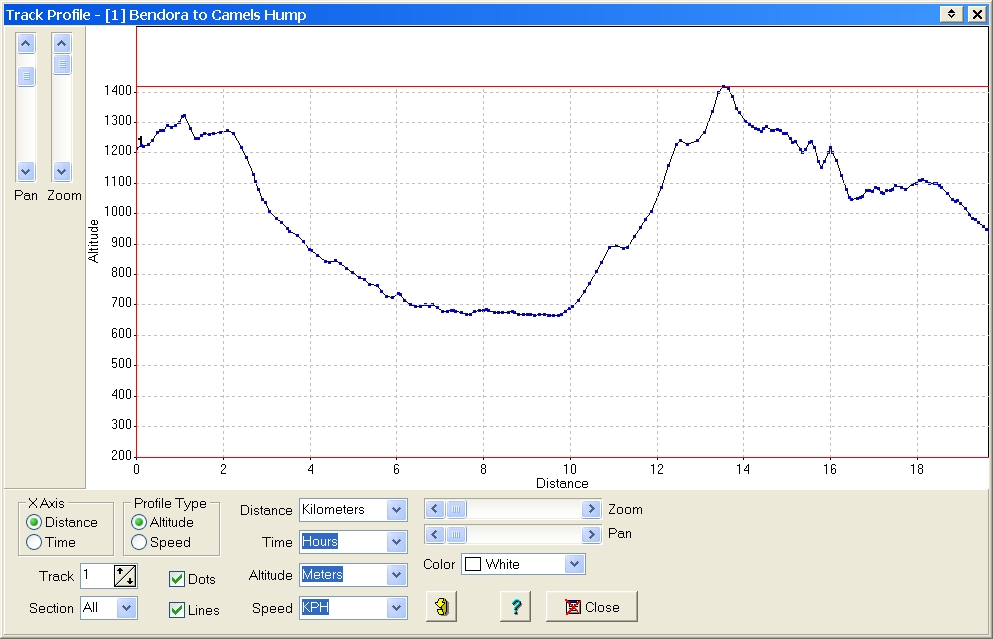
The Track Control tells me how far the proposed walk will be.
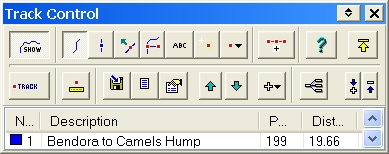
Next, using the Geoscience Australia’s 9 Second DEM data (height data), I can get a bit of an idea of the track’s vertical profile. (Another way of doing this is to generate a 3D image of the map.) To generate a profile of a planned route (this term used generically – you cannot generate a height profile of a Route in OziExplorer, it has to be a Track) via OziExplorer, OziExplorer3D must be installed and the 9′ DEM data configured via the 3D/Elevation menu in OziExplorer. Alternatively, output the proposed track to Google Earth and use the Show Elevation Profile function.
Next, I hook up the GPS to the laptop via the USB data cable and download the Waypoints into it and save them. It’s always good to have this information in the GPS to check on my map and compass navigation. The proposed track could be downloaded, too, but I don’t bother.
Then, I print out the track and Waypoints on the map segment to carry in my pocket – it’s sometimes easier to refer to that than the large topographic map.
Finally, I make up a Route Card:
Get the bounds from the Waypoint list
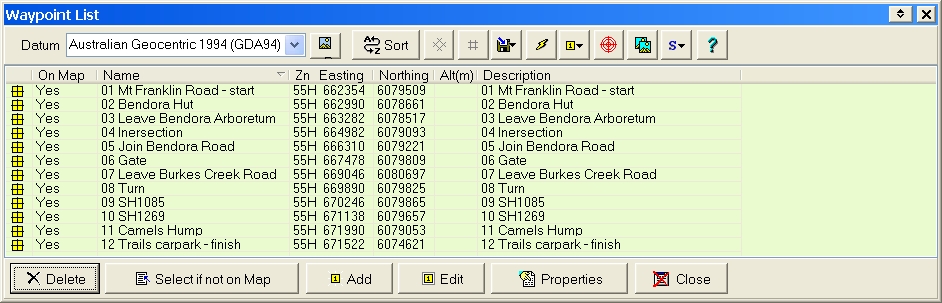
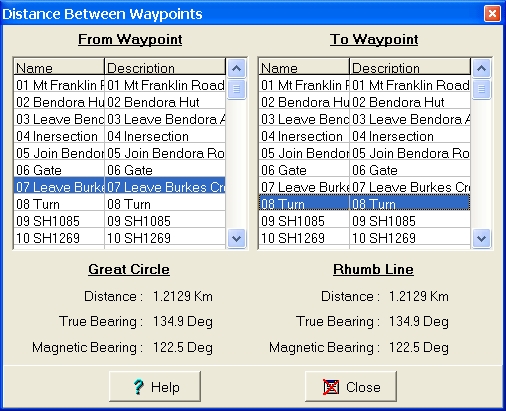
Get the distance between bounds by summing the planned track points from Waypoint to Waypoint (this is better than the distance between Waypoints which only measures the straight line distance).
Get the bearing between bounds from the Distance between Waypoints list.
Estimate what the going will be like from the map and other sources.
Of course one can do all this by hand, but the tools sure make it easier and quicker. I guess the point is to understand what it all means.
If it’s a day walk, I leave the GPS on all the time. This records the actual track (the image below is the track points as formatted by OziExplorer, not the .gpx track file as stored by the GPS):
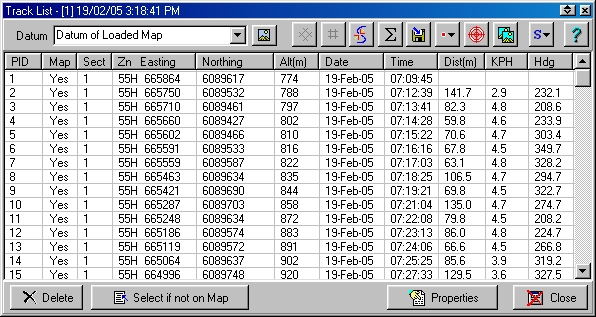
As you can see from the above, the GPS stores the actual track as hundreds of track points, each with position, altitude, time, etc – making a handy record of the walk.
Back home, I upload this from the GPS to the PC and see any variations from the proposed and relive the joy and pain.
To publish information to this blog I use:
• ArcSoft PhotoStudio to capture screen shots
• Google+ Picasaweb freeware and storage to upload and store photos
• YouTube to store videos
• Google Earth shareware to create .kmz files
• GPSBabel freeware to convert waypoints and tracks to formats interchangeable with other brands of GPS
• geomin provided by the ACT Government to convert GRs from ACT Map Grid’
• WordPress to generate the trip report post.
To publish a map segment in the walk report (and I have permission to do so from NSW and Tasmanian state mapping authorities), I use PhotoStudio to capture a screen shot from OziExplorer and store it as a jpeg file.
I select the most interesting or most representative photos from the day and upload them to Picasa.
A few words are crafted and the photos, map segment and other bits and pieces cobbled together.
If I’m planning walks in areas other than NSW (ie. I don’t have digitised maps available), I first scan the relevant portion of the map (limited in size by my A4 scanner, although OziExplorer does have a free utility which can ‘join’ map fragments – but I haven’t investigated it fully) and store it as a TIFF file (I think the advantage in using this format over, say, JPG, is that TIFF files can be loaded in parts into memory by the relevant software). OziExplorer then has a ‘Load and Calibrate Map Image’ function by which you specify the Grid References of a number of points on the map image (eg. 5). OziExplorer goes away and whirs and grinds and produces a .map file which, used in conjunction with the .tif scanned file, performs exactly like a purchased digitised map.
Anyway, it’s an interest for me, and family and friends can enjoy a vicarious bush walk.
Andrew Welsh
16 September , 2016 8:24 pmDo you still use OziExplorer? Have you compared it with Oztopo?
I have a Garmin Oregon 650 with Garmin Topo Aust & NZ v4 but would like updated and higher resolution maps in my GPS and BaseCamp.
Johnny Boy
16 September , 2016 9:37 pmHi Andrew. Not quite sure what you mean. Yes, I still use OziExplorer (software, like BaseCamp). I use Oztopo digital maps in my GPSr. Cheers. john