Last updated 16Mar24
Information Bit(e)s
The vast majority of bushwalkers/hikers are more than happy to share tips on navigation and bushcraft. That makes being out in the bush/on a trail more enjoyable for all and assists in managing expectations and risk.
1 Where am I?
There are two main ways of describing your location – grid coordinates and geographic coordinates. There’s also a handy third way, called what3words.
Grid Coordinates ... more
Grid Coordinates
If a map has a grid overlayed on it, a location can be specified using Grid Coordinates.
Grid lines are equally spaced vertical and horizontal lines. The vertical lines divide the map area into East and west and are called Eastings. The horizontal lines divide the map area into North and south and are called Northings.
On a 1:100,000 scale map, a grid square has sides which represent 1km on the ground. On a 1:25,000 scale map, grid square sides are 4cm long and represent 1km on the ground.
The grid overlay is called the Universal Transverse Mercator grid, UTM.
You might imagine that it gets a bit complicated overlaying a 2-dimensional square grid on the 3-dimensional curved Earth’s surface. So let’s simplify things a bit.
Imagine the earth as an orange with 60 segments. Each is a strip of 6° of longitude wide. This is the Zone Number. Next, horizontally slice the orange into 8° slices of latitude. This gives the Zone Letter. (There is no zone letter I and O; zone letter X is 12° of latitude.) Together, these make up the Grid Zone Designator, or just the Zone.
Here they are on a ‘flat earth’.

UTM Grid Zone Designators
The central area of NSW, including all the ACT, is in Zone 55H.
The Zones are further subdivided into 100,000m squares, with a very complicated (and repeating) two letter naming system.
Finally, the numbers derived from the grid lines on the map (the Eastings and Northings) can be used to specify a location. The Easting is given first, followed by the Northing.
A topographic map has lots of grid information in its margin.

Topo map showing grid information
1 The grid lines are numbered in increments of 5 on the body of the map eg. Easting 85, Northing 00
2 Some Eastings and Northings near the border are fully specified to the metre eg. 683000mE and 6099000mN. Others are specified just with two digits eg. Eastings 82, 84; Northing 98. Yet others are specified with three digits eg. some Eastings (not shown in the map segment above) or four digits eg. Northing 6100
3 The 100,000m square two letter identifiers are shown eg. FA, FB
4 Then there’s (MGA). What does that mean – covered later.
It seems a bit complicated, but there is a pattern and grid coordinates are far easier to use than lat/lon when using such topographic maps.
1 The longest number is the distance in metres from an origin within the Zone. (For an easting, the origin is the Central Meridian, a pole-to-pole line in the centre of each of the 60 zone numbers. It’s allocated an easting value of 500,000m. For a northing, the origin is the equator and it’s allocated a northing value of 10,000,000m. No need to remember this stuff at all!)
2 All the other shorter numbers are just abbreviations of the complete long number. It’s the larger text numbers that should be noted. Eg. 83 in 683000mE, 99 in 6099000mN, 00 in 6100.
3 Other items to help specify a location include the 100,000m square identifier (eg. FA, FB), and the map name and scale (eg. Hall 8727-4S 1:25000).
A map with a superimposed grid may have a guide in the legend showing how to give a grid reference.

How to quote a grid reference
Let’s get the grid reference of the point on the following map segment.

What’s the GR?
1 What’s the grid Zone Designator? 55H
2 What’s the 100,000m square identification? FA
3 What’s the Easting to the left of the location (large text numbers)? 84
4 Estimate the tenths from the Easting to the location, or measure using the appropriate scale on your baseplate compass? 3
5 What’s the Northing below the location (large text numbers)? 98
6 Estimate the tenths from the Northing to the location, or measure using the appropriate scale on your baseplate compass? 2
7 What’s the map name and scale? Hall 8727-4S 1:25,000
8 What’s the map datum (see later)? MGA
So the location of the point is GR FA843982 (MGA) on Hall 8727-4S 1:25,000.
The location can be specified in lots of different ways, but it must be unique.
1 GR FA843982 (MGA) on Hall 8727-4S 1:25,000
2 Using the full specification of the Easting and Northing from the UTM grid would give UTM 55H 684300 6098200 (MGA)
3 Note the warning in the ‘How to’ above – “The 100 000 Metre Square Identification repeats every 18°. If reporting beyond 18° in any direction, prefix the reference with the Grid Zone Designation”. In this case, use GR 55H FA843982 (MGA)
4 If your trip is only on this map and all other maps in the party have the same datum, you could use GR 843982. That’s how easy it is!
A 6-figure GR (3-figure Easting + 3-figure Northing) places the location somewhere within a 100m square. If you are able to estimate 4-figure Eastings and Northings to produce an 8-figure GR, the location would be somewhere within a 10m square. Using a GPS which shows 5-figure eastings and northings, a 10-figure GR can be quoted which, in theory, is accurate to the metre. (However, due to various factors, your GPS accuracy may be less than that and to top it off, the map might not be that accurate.
GR is short for MGRS (Military Grid Reference System). When setting the Position Format in your GPS, the option may be MGRS.
Geographic Coordinates ... more
Geographic Coordinates
Geographic coordinates specify a location in latitude and longitude (lat/lon).
Latitude is the angular expression of the distance north or south of the Equator. The Equator is 0° latitude; the South Pole is at 90°S; the North Pole is at 90°N.
Longitude is the angular expression of the distance east or west from an imaginary line called the Prime Meridian. The Prime Meridian is 0° longitude. The Prime Meridian passes through Greenwich, England.
Lat/lon can be expressed in degrees, degrees and minutes, and degrees, minutes and seconds. You may find this reflected in your GNSS (Global Navigation Satellite System) receiver (ie. a ‘GPS’ device such as a handheld or watch) when setting up the Position Format to be used. Options include hddd.dddddd°, hddd°mm.mmmm’ and hddd°mm’ss.ss”.
Because of its location, in Australia lat/lon are always South and East. Latitude is given first, followed by Longitude.
For example, Mt Majura in the ACT is at lat/lon 35.238003°S 149.181353°E.
Many popular mobile phone apps (eg. AllTrails, BackCountryNavigator) use lat/lon, rather than a grid coordinate location.
A topographic map may have lat/lon listed at its corners. Some maps may have alternating short black lines along the edges to indicate minutes of latitude and longitude.

Topo map showing corner lat-lon and alternating black line minutes
what3words ... more
what3words
what3words is a mobile phone app. Every 3m square in the world has been given a unique combination of three words. It’s a lot easier to communicate the 3 words than a numeric grid or geographic location. It uses your phone’s GPS and also operates when out of mobile phone reception or if your phone is in Airplane mode.
Your what3words location is also shown in the Emergency+ mobile phone app. You do not have to have the what3words app installed for this feature to work.

Emergency+ including what3words location
Of course, if you need to communicate your what3words location to someone else, you will need phone reception or some other means such as inReach/sat phone.
I am aware of recent exchanges with the 000 emergency call centre. They prefer an incident location in what3words.
2 What’s a map Datum?
Every map is based on a datum, a mathematical surface model that best fits the shape of the Earth. Australian maps are currently based on the GDA datum.
GDA ... more
GDA (Geocentric Datum of Australia) was defined in 1994 and is based on a mathematical surface that best fits the shape of the Earth as a whole, with its origin at the Earth’s centre of mass. Strictly speaking, GDA (or GDA94) is used when referencing geographic coordinates and MGA (or MGA94) – Map Grid of Australia – is used when referencing grid coordinates.
The datum of a map may be shown in the map legend or near the map border.

Topo map showing datum information
AGD ... more
An older datum, AGD (Australian Geodetic Datum), was defined in 1966 and best fitted the shape of the Earth in the Australian region only. Strictly speaking, ADG (or ADG66) was used when referencing geographic coordinates and AMG (or AMG66) – Australian Map Grid – was used when referencing grid coordinates.
An older edition map may show both datums. Here’s a segment of the same map as above but printed at an earlier date. Key AMG eastings and northings are shown in blue.
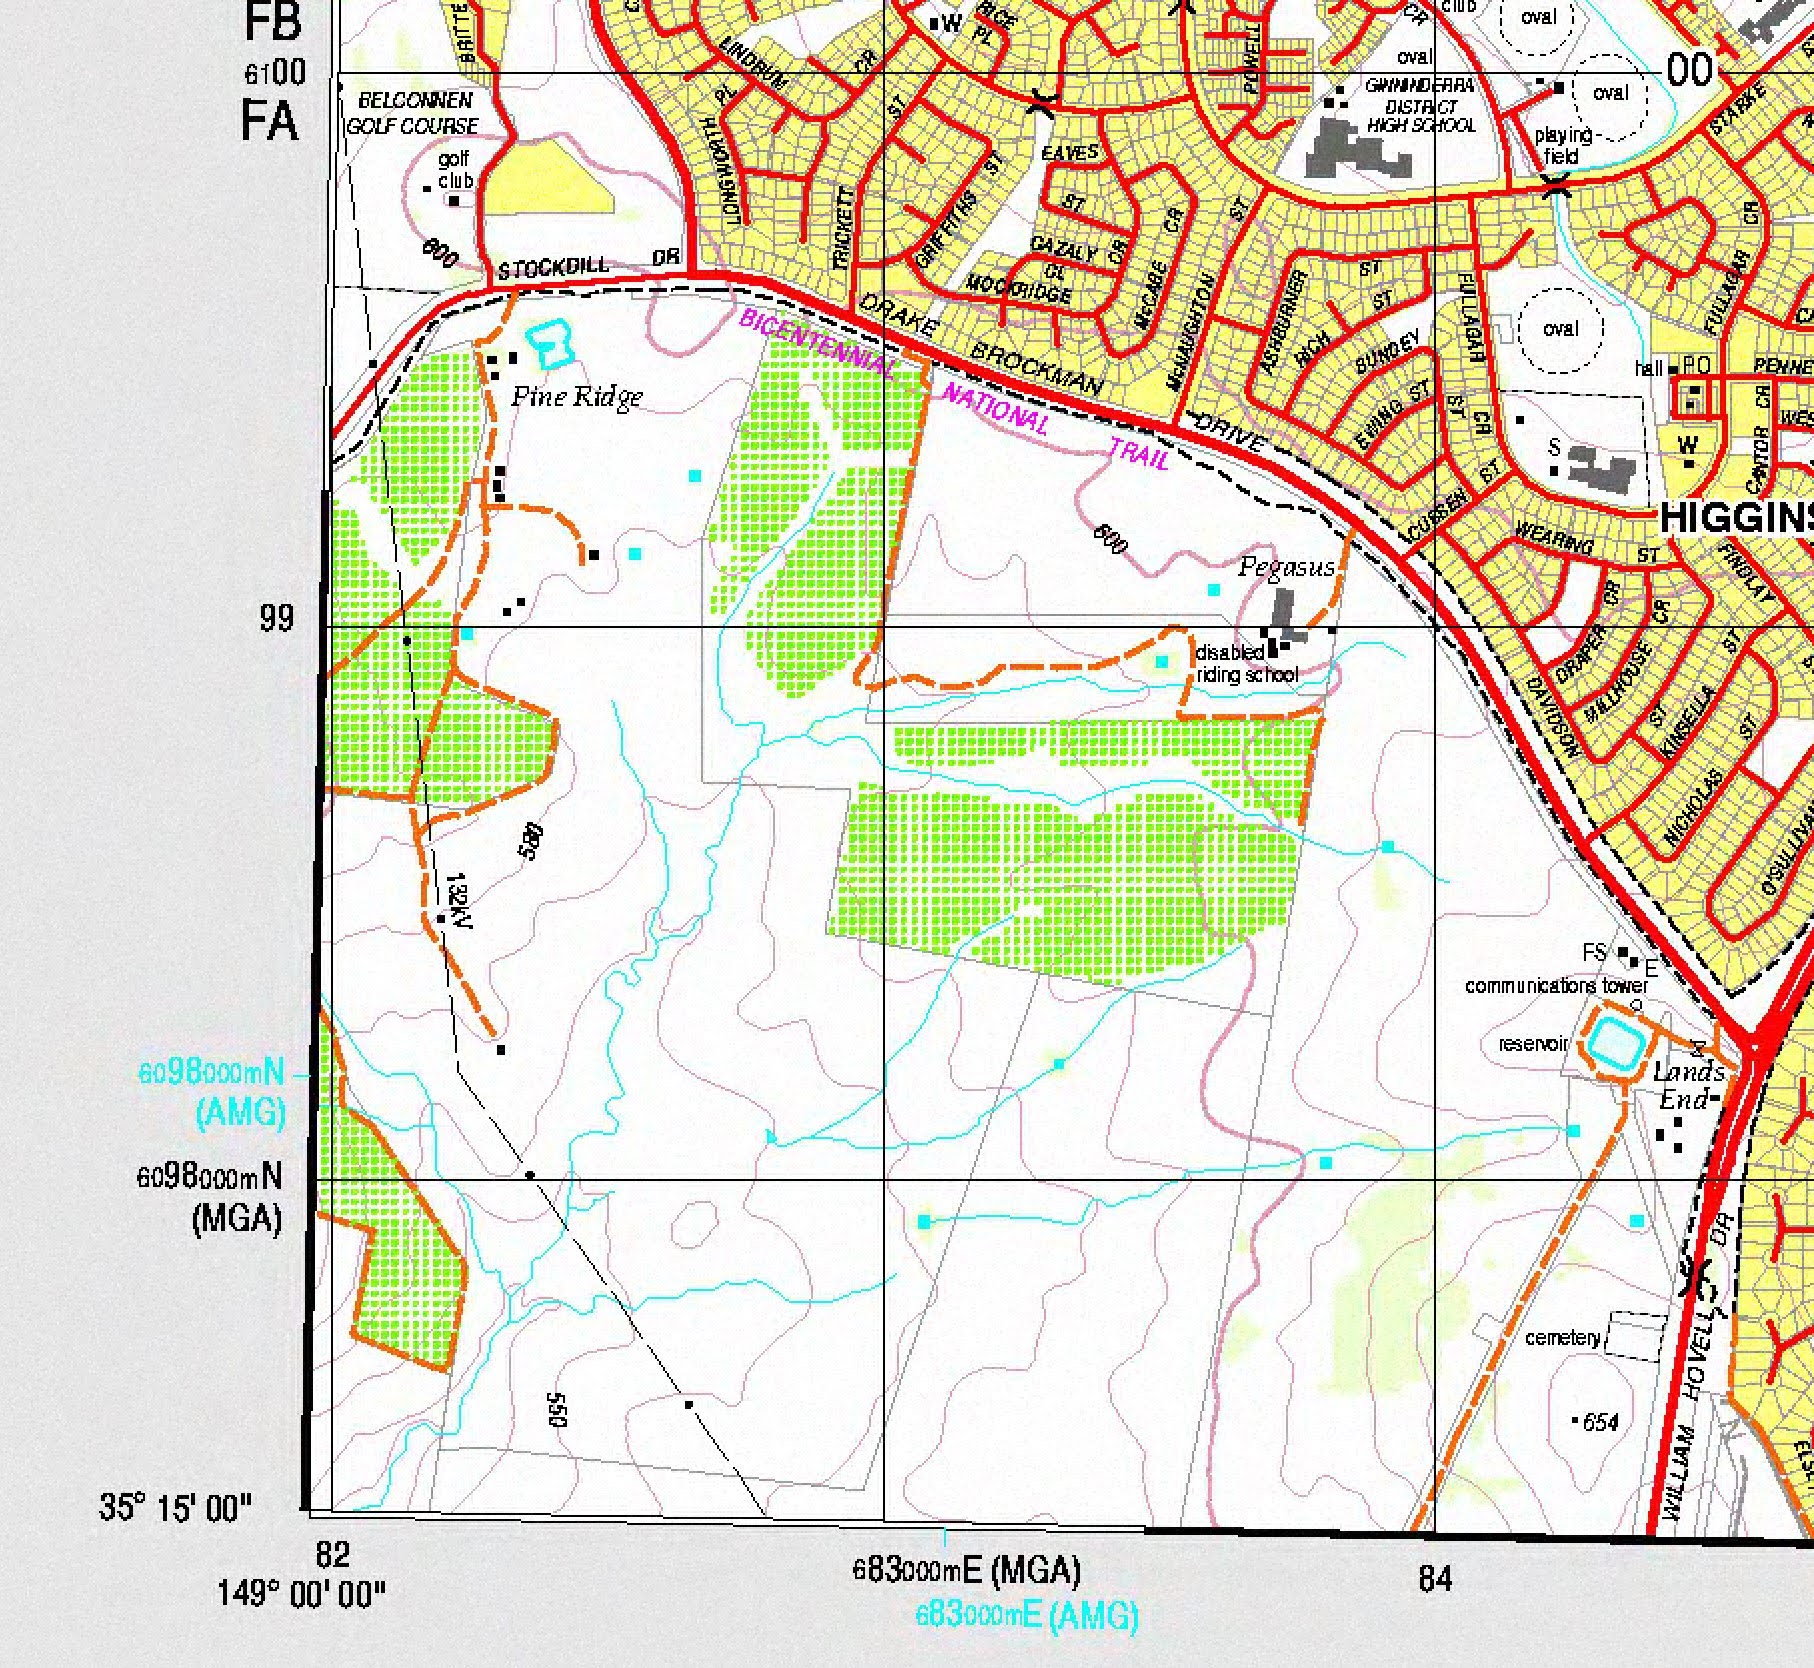
Topo map showing MGA and AMG datums
An even older version of this same map, printed before 2000 (when mapping authorities adopted the newer GDA datum) of course shows no datum. At the time, there was only one.

1st edn topo map showing no datum
GDA2020 ... more
A newer datum, GDA2020 (Geocentric Datum of Australia 2020), was released in 2017 and is coming into use. It was introduced to include changes in the Earth’s surface (e.g. plate tectonic motion). GDA2020 positions are around 1.8m northeast of GDA94.
WGS84 ... more
WGS84 (World Geodetic System 1984) is a reference frame used by GPS (Global Positioning System).
For bushwalkers/hikers, for all intents and purposes, GDA94 ~= WGS84. You won’t find AGD, GDA or GDA2020 options in your GNSS device when setting up the Map Datum to be used. Select WGS84.
GDA/AGD Differences ... more
It is important that you confirm the datum of a location given by someone else. A GR in AGD66/AMG66 differs by around 200m on the ground from the same GR in GDA94/MGA94. This could be extremely relevant if you are walking near a cliff line! As time passes and old bushwalkers using maps with AMG66 datum hang up their boots, this will become less of an issue. That’s why local 1:25000 topo maps available for download via SIX etopo at https://maps.six.nsw.gov.au/etopo.html now only show MGA.
3 Which Way is North?
There are three different north points of interest to bushwalkers/hikers – True North, Grid North and Magnetic North. The map you are using may have a North Points diagram.
TN (True North) ... more
True North (TN) is the direction to the Earth’s geographic North Pole.

North Points diagram
Grid North (GN) ... more
Grid North (GN) is the direction of the vertical grid lines (Eastings) on a topographic map.
North Points diagram
Magnet North (MN) ... more
Magnetic North (MN) is the direction from any point on the surface of the earth towards the Earth’s north magnetic pole (located somewhere in northern Canada).
North Points diagram
North Points Discussion ... more
Bushwalkers/hikers can usually forget about TN (Santa lives there), the Grid Convergence angle, and the annual variation in MN.
The important north points are GN and MN, and the angular difference between them, the Grid-Magnetic angle.
The Grid-Magnetic angle ranges from about 5° west of true north in Western Australia to about 15° east of true north in eastern Australia. The whole point of the following diagram is to show this variation.

Isogonals
Small local variations in the Grid-Magnetic angle in the ACT region can be seen if you examine sequential west to east Second Edition 1:25000 topographic maps Bobbys Plains, Cotter Dam and Canberra. They have Grid-Magnetic angles of 13.2°, 13.4° and 13.6°.
In the ACT, use a Grid-Magnetic angle of 13° or 14°.
Why the imprecision? Try setting a bearing to a degree of accuracy on your baseplate compass.
4 The best free guide to Map Reading
Geoscience Australia produces a great Map Reading Guide – How to use topographic maps.
5 Measure Magnetic and Grid Bearings
Bearings measured on the ground are Magnetic bearings, and map measured bearings are Grid bearings. How do we measure them and convert between the two?
Metal objects can affect the magnetised needle in a compass, so move away from such objects. Always hold the compass level.
To determine a magnetic bearing from where you are to a visible feature, hold your compass level and:
- point the Direction of Travel Arrow at the feature
- turn the Graduated Dial so that the red N lines up with the red end of the compass Needle
- read the Magnetic bearing at the Index Line.
To measure a grid bearing on a map:
- align a side edge of the baseplate of your compass against the two points between which the grid bearing is to be determined. It might be your current location and your desired destination
- make sure the Direction of Travel Arrow points to the destination or you will get a bearing 180° out
- turn the Graduated Dial so that the Orienting Lines and Arrow align with the Eastings on the map
- read the Grid Bearing at the Index Line.
6 Convert between Magnetic and Grid Bearings
- MGA – Magnetic to Grid, Add
- GMS – Grid to Magnetic, Subtract.
To convert a Magnetic bearing to a Grid bearing (in all but the SW of WA in Australia), Add the grid-magnetic angle.
Use a memory association to quickly recall MGA. I remember an old MG (Morris Garages) model A sports car. But you can always go back to first principles and draw/imagine the bearing line on the North Point diagram.

MGA
Obviously, the angle from MN to the red bearing line is smaller than the angle from GN to the red bearing line, So MGA.
To convert a Grid bearing to a Magnetic bearing (in all but the SW of WA in Australia), Subtract the grid-magnetic angle.
Use a memory association to quickly recall GMS. I learned mine in the Army Reserve many years ago and it’s not worth repeating. Perhaps you could remember Get More Sausages. But you can always go back to first principles and draw/imagine the bearing line on the North Point diagram.
GMS
Obviously, the angle from GN to the red bearing line is greater than the angle from MN to the red bearing line, So GMS.
7 Orienting a Map
It’s best to orient your map before using it.
Turn the map so that features on the map line up with the same features you see on the ground.
What happens when you can’t see nearby features on the ground (eg. you’re deep in a gully, in a whiteout)?
Align GN with MN, then correct for Grid-Magnetic angle.
Method 1
- Align the Orienting Lines with an Easting on the map grid
- Rotate the map until the north (red) end of the magnetic needle aligns with the Orienting Arrow
- Adjust for the grid-magnetic angle.
Method 2
- Place the compass on the map, with an edge of the baseplate parallel with an Easting and the Direction of Travel arrow pointing to Grid North
- Rotate the map until the red end of the compass needle aligns with the Index Line
- Adjust for the grid-magnetic angle.
8 Plot a compass bearing on a map – what’s that hill over there?
You take a compass bearing from a known location to a feature. How can you identify that feature on a map?
- take the compass bearing – hold the compass level; point the direction of travel arrow at the feature; turn the compass housing until the N (red) end of the needle aligns with the orienting arrow; read the magnetic bearing at the index line
- convert the bearing from Magnetic to Grid – MGA
- turn the compass housing so that the grid bearing lines up with the index line
- place corner of baseplate at current location. Rotate the whole compass until the orienting lines are parallel with the Eastings. Ensure the orienting arrow is pointing North
- the feature will be along the line of the side of the baseplate.
9 I want to get to that track junction, but I can’t see it – what compass bearing should I follow?
You want to get to a map feature, but you can’t see it. What bearing should you set on your compass to get there?
- measure the grid bearing – align a side of the baseplate between your known location and the desired feature, with the direction of travel arrow pointing to the desired feature; rotate the compass housing until the orienting lines are parallel with the Eastings; read the grid bearing at the index line
- convert the bearing from Grid to Magnetic – GMS
- set the Magnetic bearing at the index line
- rotate the entire compass (and your body) so that the N (red) end of the needle aligns with the orienting arrow
- the direction of travel arrow shows the way to move.
10 Handy Navigation Techniques
A number of navigation techniques can help you get to your next waypoint as you navigate along the bounds of your trip.
A handrail is a natural or man-made linear feature which assists in navigation. Examples are tracks, sharp-topped spurs or ridges, fence lines, creeks, cliff lines. Creek lines are not always easy going, but it may be possible to travel parallel, just out of the denser scrub.
A feature past your intended destination that lets you know you have gone too far. If you miss the intended destination, the catching feature will assist in guiding you back to your destination.
A point near your objective, easily identified on both map and on the ground, used to guide you to your intended destination. For example, you are wanting to reach a hut in a forest. You identify a nearby creek junction and navigate to that. Once there, the hut will be much closer and easier to find. As another example, after setting your compass bearing to your destination, look on the skyline in the same direction for a distinct feature (eg. hill or saddle) and walk towards it.
Intentionally aiming to the left or right of your intended destination to a nearby linear feature (handrail), so you have a known direction to turn once the handrail is reached. For example, if you are heading on a compass bearing directly for the cars on a road, you may arrive at the road but miss the cars. You would not know which direction to turn to reach the cars. If you intentionally set your compass bearing to the left of the cars, you could confidently turn right on reaching the road.
- If watch set to daylight savings, convert it to standard time
- When South of the Tropic of Capricorn, hold the watch with 12 pointing to the sun (check by ensuring that the shadow of a vertical stick falls along the 12 axis)
- NORTH is found by bisecting the angle between 12 and the hour hand.
11 Are We There Yet?
There are various metrics that will assist in answering that question. Perhaps the best way is to know your own walking pace in a variety of conditions and use that as a basis.
William Naismith was a Scottish mountaineer and in 1892 developed a time estimation formula for distance on a route in varying conditions. There are many variations, but let’s keep it simple.
“Naismith’s Rule – for an average walker with a medium pack, allow
- 1 hour for every 4km of easy going; 3km of easy scrambling; and 1½km of very rough country, deep sand, soft snow or thick bush
- add 1 hour for every 500m up, and 1 hour for every 1000m down.
For very fit and experienced walkers reduce the total time by one third, and for larger, less fit or less experienced groups, this rule may be optimistic.” (taken from Bushwalking and Ski Touring Leadership, Handbook of the Bushwalking and Mountaincraft Training Advisory Board Inc, 3rd edn, 2000).
| Track | 12 min/km | 5 km/hr |
| Open scrub | 20 min/km | 3 km/hr |
| Medium scrub | 30 min/km | 2 km/hr |
| Thick scrub | 40 min/km | 1.5 km/hr |
| Rock hopping | 30 min/km | 2 km/hr |
| Steep slope | Add 5-10 min/100m climbed | |
(taken from Finding Your Way in the Bush by George Carter, Walk Secretary, Canberra Bushwalking Club, rev Apr 1993)
Adjust using other factors
- Group spread – the larger the party, the slower the trip. Everyone walks at a different preferred pace and has different capacities and fitness. No two walkers will go behind a tree at the same time!
- Add extra time for stops – water breaks, morning tea and lunch, sightseeing.
- Multi-day trip – slower carrying an overnight pack compared to a day pack
- Age – don’t I know it
- Local knowledge of conditions – it’s easier to walk country after a bushfire compared to rampant regrowth a couple of years later. Some off-track walking in Namadgi National Park is less than 1km/hr.
12 ‘About’ Bearings
It’s somewhat difficult to measure a precise bearing using a compass.
Navigating with a digital device will give you an exact bearing. “What’s the bearing to the next waypoint?” can be answered, after a quick glance at your device, with “It’s n degrees magnetic”. And the compass in the GNSS (eg. GPS handheld, watch) will always show the bearing from your current position to the destination. Modern, 3-axis compasses in such devices will show the correct bearing even if you are stationary.
It’s more difficult to measure a bearing on a map and translate it to your compass, or sight a bearing using your compass. So the answer might be “It’s about n degrees magnetic”.
Does an imprecise bearing matter? Will you end up missing your objective?
Horizontal deviation (lateral drift) increases with distance. Eg. for 4° difference in bearings at 500m deviation will be 35m and at 1km deviation will be 70m.So be as accurate as you can in determining a bearing and keep the distance to next aiming point relatively short.

Lateral drift
Diagram from The Backpacker’s Field Manual by Rick Curtis.
On the diagram above, the actual bearing from Start to Destination is 338°M. If one member in the party set their compass at 336°M and another member set theirs at 340°M, and the distance from Start to Destination was 500m, they would end up 35m apart.
Lateral drift = dist(Start-Dest)*tan(bearing diff)
eg. 1° diff @ 1km = 17.5m; 2° diff @ 500m = 17.5m; 4° diff @ 500m = 35m
13 Hints learned about walking in the bush
The best way to develop your own walking style is to just do it! The following hints from my falls, scratches, other boo-boos and blood, sweat and tears.
- The easiest way to precipitate an incident is to split the party. Be very careful when extreme circumstances require the party to split.
- Party members should walk as a group. Before you become visually separated, call out so that a regrouping can occur.
- A ‘tail end Charlie’ is normally appointed, particularly for a large group. Other party members should always be in front of them. If someone needs to stop (eg. to ‘find a tree’), the rest of the party should move on a few tens of metres, stop and wait.
- You just can’t afford to look where you place each and every step. Gaiters will provide some protection from snakes if you accidently tread on one and give you extra confidence when you can’t see your footfall.
- Scrub gloves (eg. gardening gloves) will give you extra confidence and speed when ‘breast-stroking’ through scrub or swinging by tree trunks. Will also protect your hands from scratches.
- Eye protection (eg. sun glasses, clear protective glasses) is useful.
- Keep well back from the walker in front of you. If you get slapped in the face by a bush, you’re too close. Even more so with walking poles.
- If your walk leader allows participants to walk at their own pace on tracks and you are ahead, stop at every track junction or prominent feature so the party can regroup and set off again in the correct direction.
- Don’t regroup like a caterpillar! When the head of a caterpillar stops and the tail catches up, the head takes off again. Give the slower walkers at the tail a chance for a breather, just like the faster walkers at the head have had.
- When rock scrambling, 4 points of contact can be safest. Move one at a time of hands, feet and butt!
- Step over small logs across your path. Don’t stand on top of them. They’re slippery when wet or frosty.
- Use the risers and treads of steps. If you walk the more regular slope immediately beside the steps, you’ll aid erosion and the earlier demise of the steps.
- If at all possible, walk through shallow water. Don’t widen the track by walking the drier sides. In fact, water will often lie on firmer ground.
- If a gate is locked and has no step through, climb over closest to the hinged end. This will put less strain on the gate and it will waggle less. If a gate can be unlocked, leave it as you found it.
14 Really, truly technobabble
Changes in the Grid-Magnetic angle.
I posed the following question to the NSW Spatial Services Hub:
The North point diagram on the 8727-3S Tuggeranong 1:25000 topo printed map (copyright 2003) includes “Grid-Magnetic Angle 13.7 degrees. Magnetic North value is correct for 2003 and moves easterly by less than 0.01 degree per annum.”
The North point diagram on the currently available e-topo map from SIX, 2017 edition, includes “Magnetic North is 13.6 degrees East of Grid North.”
Why is the G-M angle for 2017 less than that for 2003, when MN moves slightly eastward?
I’m not being pedantic. I teach map and compass navigation at the Canberra Bushwalking Club and would like to know the definitive answer.
Within days I received the following answer:
The simple answer is that the underlying Australian Geomagnetic Reference Field model (AGRF) has improved over time.
The model, administered by Geoscience Australia, is updated every 5 years.
While the magnetic declination drift over time is likely to be easterly in each model (at your location), the underlying value may have improved in value and accuracy.
You can compare the most recent model (2020): https://geomagnetism.ga.gov.au/agrf-calculations/agrf-model.
… with some previous models:
e.g. 2010 model https://www.ga.gov.au/ausgeonews/ausgeonews201006/geomagnetic.jsp
e.g. 2005 model http://www.ga.gov.au/ausgeonews/ausgeonews200503/geomag.jsp
For easy access to the latest magnetic declination at any location, you may consider this calculator:
https://geomagnetism.ga.gov.au/agrf-calculations/agrf-form
Screen shot below shows the most recent AGRF2020.
For your interest, I recommend a review of similar graphics at all of the links above.

AGRF2020 Declination at Epoch 2020.0
15 Printing correct scale NSW SIX e-topo maps
Printing maps and map segments yourself may save you some time and money. Printed maps may be available from some outdoor stores, but are becoming hard to find. They are printed on fairly thin paper and fold corners can soon become torn.
There are many sources of topographic and schematic maps. Find them on the internet.
The organisation responsible for producing 1:25000 topographic maps of primary use to bushwalkers/hikers is the NSW Department of Land and Property Information. It provides a Spacial Information eXchange (SIX) tool for accessing Georeferenced PDF Topographic Maps. Customers are permitted to print their own hard copy of a Topographic GeoPDF Map.
Go to e-Topo. Zoom and pan to the area of interest. Click on a location in the area of interest. The map name appears as the Select a map: entry. Click Download PDF.
Alternatively, go to the Spacial Map Viewer. Zoom and pan to the area of interest. From the Layer List Widget, turn on GeoPDF Download. Click on a location in the area of interest. Click on the TOPOGRAPHIC MAP icon to download it. You can then save the GeoPDF.
Open the map, using a pdf viewer such as Adobe Acrobat DC.
Pan and zoom as required.
To control what part of the map is to be printed on an A4 page, do Edit, Take a Snapshot. Define an area of maximum 7 * 5 or 5 * 7 grid squares.
Access the Acrobat Print function. Click the Custom Scale: radio button. Leave the % at 100. Click Print.
Check that the width and height of a map square on the printed map segment is 4cm. Use the 1:25k scale on your baseplate compass.
An idea is to laminate the A4 page in a home laminator pouch.
The downloaded PDF could be taken to a print service facility (eg. OfficeWorks) and printed in A3. I haven’t tried this.
I understand that CalTopo can produce the same result. I have not tried it.
I used to print A4 segments by scanning a printed map. Not much good if you don’t own the printed map, or your version is out of date.
The basis for this information bite comes from Printing A4 NSW topographic maps from your printer, on the Hiking Sydney website. This source was brought to my attention by a post by Todd Dzur on the A.C.T Hikers Facebook page, in answer to a question from Cam West. Comments by Beat Oppikofer also encouraged me to examine this topic.
16 Australian Walking Track Grading System
The grading system assesses a walk’s difficulty based on several criteria, including: experience required, steps, gradient, path quality and signage. The walk’s final grade is based on the most difficult of these 5 criteria, rather than an average. So some walks will have criteria that meet an easier grade.
It is beginning to be used on signage for well-established trails in the ACT.
Grade 1 – No bushwalking experience required. Flat even surface with no steps or steep sections. Suitable for wheelchair users who have someone to assist them. Walks no greater than 5km.
Grade 2 – No bushwalking experience required. The track is hardened or compacted surface and may have a gentle hill section or sections and occasional steps. Walks no greater than 10km.
Grade 3 – Suitable for most ages and fitness levels. Some bushwalking experience recommended. Tracks may have short steep hill sections a rough surface and many steps. Walks up to 20km.
Grade 4 – Bushwalking experience recommended. Tracks may be long, rough and very steep. Directional signage may be limited.
Grade 5 – Very experienced bushwalkers with specialised skills, including navigation and emergency first aid. Tracks are likely to be very rough, very steep and unmarked. Walks may be more than 20km.
The grades are developed from the following criteria.
Distance
- up to 5km
- up to 10km
- up to 20km
Grades 4 and 5 may be over 20km, but distance isn’t used for grading at these levels.
Gradient
- Flat
- Gentle hills
- Short steep hills
- Very steep
- Very steep and difficult.
Quality of track
- Well-formed track
- Formed track
- Formed track, some obstacles
- Rough track, many obstacles
- Rough unformed track.
Quality of markings
Grades 1 and 2 pretty obvious
Grade 3 – signs might be a bit more spread out
Grade 4 – sparse signage
Grade 5 – no signage.
Steps
- No steps
- Occasional steps
- Many steps.
NPWS adds extra considerations.
Experience Required
Grades 1 and 2 – no experience needed
Grade 3 – some experience
Grade 4 – bushwalking experience recommended
Grade 5 – a lot of bushwalking experience required.
Time
Grade 1 and 2 – high and low end estimates
Grades 3, 4 and 5 – estimated hours or days.
17 Leadership Styles
A range of leadership styles can be used when conducting a walk.
At one extreme is an autocratic style, where no party member is given any choice. At the other is laissez-faire, anything goes and it’s difficult for a decision to be made.
In between telling others what to do and doing nothing, might be political, evaluative, participative and democratic styles (Bushwalking and Ski Touring Leadership, Handbook of the Bushwalking and Mountaincraft Training Advisory Board Inc, 3rd edn, 2000)
Start with a style that you’re comfortable with, readily take on board suggestions and always be willing to change. Remember, we walk for the enjoyment of all.